Skip to content
  • Privileged Access Management
  • Windows
  • Linux
  • Tools
Previous Next
  • View Larger Image CyberArk Vault Certificate Signing

CyberArk | ITATP151W Security warning | Steps to resolve

What is (ITATP151W Security warning) in CyberArk Vault Server?

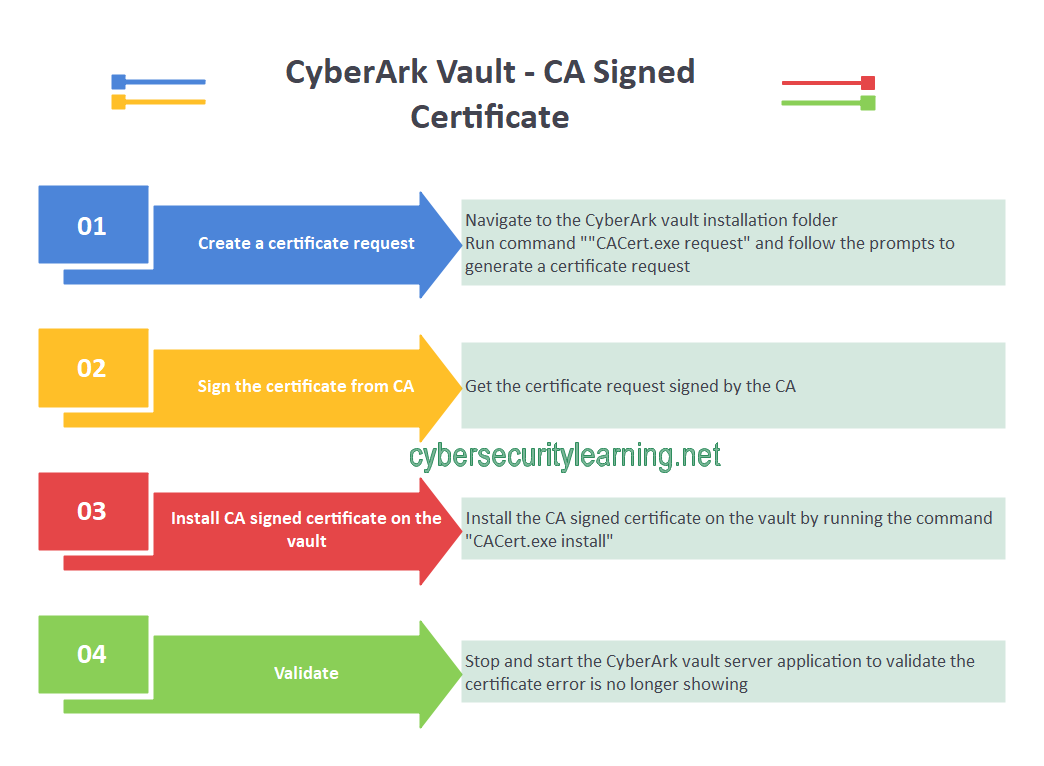
CyberArk Vault Server application is installed with a self signed certificate and as a result the Vault Server application gives a warning on launch with a reminder to use a CA signed certificate.

In this post, we will go through the steps to generate the certificate request, get it signed from Certificate Authority, install the signed certificate and finally validating the certificate.

CyberArk Vault Certificate Signing

Identifying the Error (ITATP151W Security warning)

Upon launching the CyberArk Vault Server Application a warning is given as per below if the certificate is a self signed certificate:

CyberArk Certificate Error

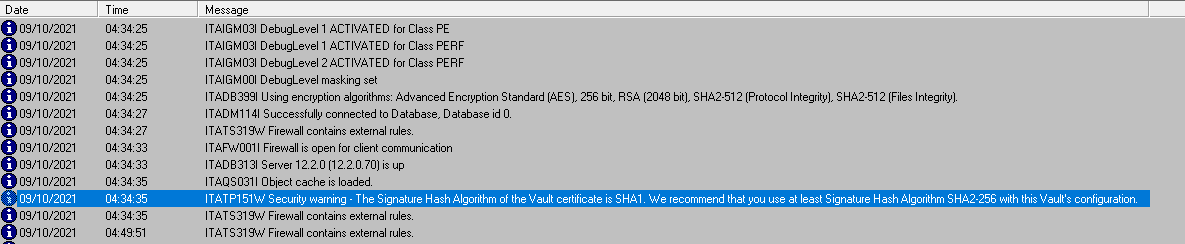
This warning comes up every time the CyberArk Vault Server application is started with a self signed certificate.

Creating a certificate request from CyberArk vault server

CyberArk provides a built-in utility to help generate the certificate request.
We can also use the Windows certificate generation utility as well but CyberArk utility makes it much easier.

The utility is called “CACert.exe” and is located under the CyberArk Vault Server installation folder.
By default, this folder is “C:\Program Files (x86)\PrivateArk\Server”

  1. Open command prompt as an administrator and navigate to “C:\Program Files (x86)\PrivateArk\Server”
  2. Run the command  “CACert.exe request” and follow the prompts

Get the Certificate Request signed from CA (Certificate Authority) and Validate

  1. Copy the certificate request content from previous step and paste it into the Certificate Authority request
  2. Generate the signed certificate and download it
  3. Copy the signed certificate to the Vault Server
  4. Install the certificate
  5. Validate certificate error is no longer showing
By Cybersecurity Student|2024-04-27T20:35:17+00:00October 9, 2021|Privileged Access Management|0 Comments

Share This Story, Choose Your Platform!

FacebookXRedditLinkedInWhatsAppTelegramTumblrPinterestVkXingEmail

About the Author: Cybersecurity Student

Related Posts

Fixing “Access Denied” Errors When Launching Sessions via PSM in CyberArk PAM
CyberArk CPM | CACPM073E
CyberArk Password Vault Web Access | Installation

Leave A Comment Cancel reply

Cybersecurity Student for Life!

© 2021 - 2025 Cybersecurity Learning • All Rights Reserved.

Page load link
ABOUT MY WORK

Phasellus non ante ac dui sagittis volutpat. Curabitur a quam nisl. Nam est elit, congue et quam id, laoreet consequat erat. Aenean porta placerat efficitur. Vestibulum et dictum massa, ac finibus turpis.

RECENT WORKS
[fusion_widget type=”Fusion_Widget_Recent_Works” hide_on_mobile=”small-visibility,medium-visibility,large-visibility” fusion_display_title=”no” fusion_border_size=”0″ fusion_border_style=”solid” fusion_align=”” fusion_align_mobile=”” fusion_widget_recent_works__title=”Recent Works” fusion_widget_recent_works__number=”6″ margin_bottom=”40px” /]
RECENT POSTS
[fusion_widget type=”WP_Widget_Recent_Posts” hide_on_mobile=”small-visibility,medium-visibility,large-visibility” fusion_display_title=”no” fusion_border_size=”0″ fusion_border_style=”solid” wp_widget_recent_posts__number=”5″ wp_widget_recent_posts__show_date=”off” /]
Go to Top